On your Ning blog, answer the following questions:
1) What are the learning targets for this lesson? What do you want students to know, understand or be able to do after this lesson?
The learning objective for this lesson is that SWBAT to understand how the moon’s orbit around Earth changes the appearance of the moon as seen from Earth. Students will demonstrate this understanding by drawing a sketch of what the moon would look like from Earth when shown where the moon is in its orbit.
2) What technological resources do you have available that relate to these learning targets?
This lesson will couple a pictorial input chart from glad with an animated video that simultaneously shows moon’s orbit around earth and the moon’s changing appearance. The video will be displayed on the overhead screen through the use of an LCD project on loan from the front office.
3) How will these technological resources enhance the students’ learning—in other words, what does technology allow you to do in relation to these learning targets that isn’t possible without it?
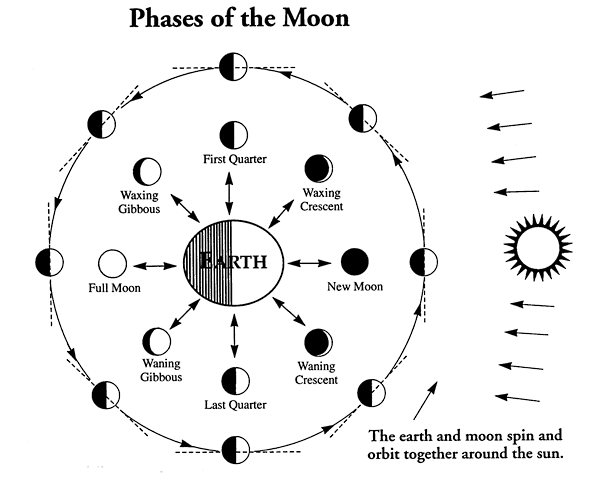
Without the video, the lesson relies solely on the pictorial input chart. The input chart is a drawing which doesn’t move. This is problematic in many ways. First, it requires the students to use their imaginations to picture the moon moving along its orbit and changing its appearance, for some students this might be a difficult concept to visualize. Secondly, the input chart has every single phase of the moon drawn on it (it looks similar to this http://www.wordquests.info/Moon-Phases-Chart-Trans.gif). This might actually lead to many misconceptions or misunderstandings. For example, a student might think that the moon is in each of this locations in its orbit all at the same time. Another misconception that can be caused by the pictorial input chart, is that the Earth remains on the same side of the Sun because the input chart depicts the Earth in an isolated position when in fact the Earth orbits the moon as the moon orbits the Earth.
The video animation eliminates all of these barriers to understand by actually SHOWING what is being taught through the input chart. The link to the video is here:
http://www.wordquests.info/Moon-Phases-Chart-Trans.gif
4) Post your lesson plan to the site.
Grade Level/Subject: 3rd Grade Literacy
Date: January 15, 2010
Established Goals/Standards: Earth Sciences 4.b Students know the way in which the Moon’s appearance changes during the four-week lunar cycle.
Essential Questions or Habits of Mind: Why does the moon appear to change shape?
Essential Understandings: The moon only appears to change shape because of its orbit around the Earth and the light of the sun.
Knowledge:
-The moon orbits around the Earth as the Earth orbits around the sun.
-It takes the moon approximately 28 days, or one month, to orbit around the Earth.
-Sunlight is reflected off one half of the moon, the other half remains in a “shadow”.
-How much of the sun lit side is seen from the Earth depends on the moon’s position in it’s orbit.
-The process of the Moon’s orbit and changing phases is known as the lunar cycle.
-There are 8 phases to the lunar cycle (new moon -> waxing crescent -> first quarter moon -> waxing gibbous -> full moon -> waning gibbous -> third quarter moon -> waning cresecent)
-Once the lunar cycle is complete, it starts over again at the new moon phase.
Skills:
-determine the phase of the moon based on a diagram of the moon’s location in its orbit.
Evidence of Learning (Product or Assessment):
8 question worksheet (one question for each lunar phase) with student drawn illustrations of what the moon would like from Earth based on a diagram of where the moon is in its orbit.
Differentiation: Preteach vocabulary of cycle and phase prior to the lesson through use of the CCD. Include TPR and call and response tied to vocabulary. This is differentiation for ELL’s.
Materials: CCD, paper for input chart, LCD projector, video on youtube, individual marker boards, markers.
Teaching Strategies & Sequence:
Opening (5 minutes)
Students will be at their desk. They will read the learning objective chorally, “We will be able to understand why the moon appears to change shape” – this objective is worded in kid friendly language framed in a manner that they could understanding given their current schema.
After students read the objective, I will post a large printed picture on the board of the moon in the waxing crescent phase. “When I went outside last week, the moon liked like this.” Then I will post another picture of the moon in the first quarter moon phase. “When I went outside last night and looked at the sky it looked like this.” I will give students a moment to process. “How did this happen? Did the moon grow? Did it change shape? Did someone grab the moon and stretch it out?” I will ask students to put their heads together and discuss what this happened. After this I will hear from a view students to get a gauge on their prior knowledge.
I will then explain to the students that this mystery of sorts is what we will be solving during the lesson.
Introduction to New Material (20 minutes)
Students will transition to the rug bringing individual marker boards and their marker from their seats. On the board in front of the rug will be in the input chart. I will first draw in the Sun, explaining to students that all light in our solar system comes from the sun. I will then draw the Earth and shade in the side away from the sun, explaining to students that this side is dark because it doesn’t get light from the sun. I will then draw the moon in its orbit at the new moon phase. I will explain that just light the sun only lights up half of the Earth, it does the same to the moon. I will shade in the part of the moon facing the Earth. I will then ask students, “if we were standing at Earth, looking at the moon like this, what would we see?” I will have students turn to their neighbor and take answers until I receive the correct response. “We would see nothing because the side of the moon facing us,” I will explain, “is the dark side.” I would then sketch next to the moon in the orbit, what it would like from Earth. I will label this drawing “new moon,” the name of its phase. I will then explain to students that the moon doesn’t stay dark to us forever because it moves or obits just like the Earth does. I will then draw the moon in its next phase on the orbit. “Now the moon has moved, and the same side is still not receiving sunlight, so it is still dark. But because it has moved, we see something different. We now can see part of it with the sunshine.” I will draw a diagonal line through the moon in its orbit, show the parts we can see. I will then sketch a drawing of what the moon looks like from the Earth in this phase and label it waxing crescent. (later in the week, I further develop the terms waxing and waning as well as crescent and gibbous through the CCD). I will continue this process for every single phase.
Once this is complete, I will have students watch the animated clip of this process at http://www.youtube.com/watch?v=2aFGNGEcDOk using the LCD projector.
When this is done, I will have students discuss what they’ve learned with their partner about why the moon appears to change shape. Students will come back together and I will randomly call on students to share as a check for understanding.
If I am comfortable with students understanding WHY the moon appears to change shape, I will move on to the next portion of the INM.
In this part of INM, students will practice watch me model the skill of determining what the moon will look like from Earth based on a picture of its orbit. I will show them a picture on the overhead screen through the LCD projector of the moon in its orbit. I will then model, “Well this side of the moon is facing away from the sun, it most be dark, so I am going to shade it in. If I was on the Earth, I’d be looking at the moon from this angle. Am going to draw a line through what I could see. I can tell from what’s on the side of the line facing the Earth that most of the moon is light and only a small part is dark. From Earth it must look like this…” and I would sketch my drawing. I will model this twice.
Guided Practice (10 minutes)
I will then model a third time. This time I will call on students through equity sticks to walk me through the process. I will do this until I feel students can adequately explain how the process of solving these problems works.
When I feel like students understand the process, I will give show them a picture of the moon in its orbit. Students will work in pairs (they have assigned partners and numbers). Partner 1 will explain to partner two how to solve the problem and how to draw the moon based on the orbit. Partner 2 will draw on the board. Students will hold up the boards when finished. This is a CFU. Then I will give another picture of the moon in the orbits and students will switch roles. After each student has had a turn, I will give another for students to do on their own marker board alone. I will give as many problems as necessary until I feel students are ready to do the skill on their own.
Independent Practice (15 minutes)
Students will be sent to their seats. Students will have a worksheet with pictures of the moon in its orbit. For each one (there will be eight out of order) students will draw what the moon would look like from Earth based only upon the picture. When students are done, they will flip the paper over and attempt the challenge activity which shows a picture of the moon as seen from earth and asks them to find where it goes on the orbit. This follow up activity will serve primarily as an extension activity for earlier finishers.
Closing (5 minutes)
I will send return to the question posed in the opening. “So what happened to make the moon go from this last week, to this last night?” I will have students put their heads together again, and make one student from each team share out. The student will be selected randomly. Then we will check back in on the objective, reading it chorally once more and have students give a thumbs up if they feel they met the objective, a thumbs down if they didn’t or an in the middle if they are unsure.

Subscribe to:
Post Comments (Atom)
1 comment:
Jason, this is an awesome lesson! Of course I am obsessed with using technology in planning and providing visual aids for science and social studies lessons. But what I liked most about your plan was how you evaluated the resources we already have and their weaknesses. You really thought about how technology can fill in gaps that our lessons or materials are lacking. Plus, the video you found is awesome! I hope we can continue to share resources using technology!
Post a Comment