1) What are the advantages to watching a webinar as opposed to reading an article?
The first webinar I had listened to was merely a voice over a PowerPoint presentation. During the initial webinar, listeners could ask questions to the presenter, which would have been an advantage of merely reading an article, however I was watching the recording and was unable to ask questions. I actually found myself frustrated during this webinar specifically because the pace of the webinar was much slower than my reading pace would have been. This type of webinar also prevents the reader from skimming for important information and on the whole felt like ineffective use of time.
After this experience, I was about to write off webinars as something uniquely different in beneficial. Then I read Andrea’s post about Kate Kinsella’s vocabulary webinar. I watched the series of webinars and was hooked. These webinars were far superior than merely reading an article because she was able to incorporate video footage of the discussed vocabulary teaching strategies being used in a classroom. It was like reading an article but then actually being able to see what was in the article being applied. This is incredibly useful because at times, visualizing a particular strategy discussed in an article or figuring out how to actually take it and use it in the classroom can be difficult. Seeing it implemented allows me to picture how I can take that strategy and apply it in my own classroom.
2) How can you see this tool assisting your own development as a teacher?
I wish I would have known about webinars earlier. A lot of times I come across a particular concept or skill that I have difficulty understanding how to teach. If there is a webinar on teaching that particular skill or concept, I could watch it and see it in action in another classroom. My only fear is that the library of free webinars online are quite limited. Perhaps as time goes on, they will be a more prevalent resource online.
3) What are some other topics you would like to see on webinars?
It would be most useful for me to see webinars on the implementation of guided reading and how that implementation changes at different levels. This year I had students come into my class ranging anywhere between a Pre-A and a level 50. I really struggled to quickly learn how to meet each of these students needs and often times was ineffectively implementing guided reading for a particular group of students. If there were webinars on how to conduct guided reading at specific leveled groupings, it could have really improved my practice.
Saturday, January 23, 2010

Wednesday, January 13, 2010
115: Lesson Plan
On your Ning blog, answer the following questions:
1) What are the learning targets for this lesson? What do you want students to know, understand or be able to do after this lesson?
The learning objective for this lesson is that SWBAT to understand how the moon’s orbit around Earth changes the appearance of the moon as seen from Earth. Students will demonstrate this understanding by drawing a sketch of what the moon would look like from Earth when shown where the moon is in its orbit.
2) What technological resources do you have available that relate to these learning targets?
This lesson will couple a pictorial input chart from glad with an animated video that simultaneously shows moon’s orbit around earth and the moon’s changing appearance. The video will be displayed on the overhead screen through the use of an LCD project on loan from the front office.
3) How will these technological resources enhance the students’ learning—in other words, what does technology allow you to do in relation to these learning targets that isn’t possible without it?
Without the video, the lesson relies solely on the pictorial input chart. The input chart is a drawing which doesn’t move. This is problematic in many ways. First, it requires the students to use their imaginations to picture the moon moving along its orbit and changing its appearance, for some students this might be a difficult concept to visualize. Secondly, the input chart has every single phase of the moon drawn on it (it looks similar to this http://www.wordquests.info/Moon-Phases-Chart-Trans.gif). This might actually lead to many misconceptions or misunderstandings. For example, a student might think that the moon is in each of this locations in its orbit all at the same time. Another misconception that can be caused by the pictorial input chart, is that the Earth remains on the same side of the Sun because the input chart depicts the Earth in an isolated position when in fact the Earth orbits the moon as the moon orbits the Earth.
The video animation eliminates all of these barriers to understand by actually SHOWING what is being taught through the input chart. The link to the video is here:
http://www.wordquests.info/Moon-Phases-Chart-Trans.gif
4) Post your lesson plan to the site.
Grade Level/Subject: 3rd Grade Literacy
Date: January 15, 2010
Established Goals/Standards: Earth Sciences 4.b Students know the way in which the Moon’s appearance changes during the four-week lunar cycle.
Essential Questions or Habits of Mind: Why does the moon appear to change shape?
Essential Understandings: The moon only appears to change shape because of its orbit around the Earth and the light of the sun.
Knowledge:
-The moon orbits around the Earth as the Earth orbits around the sun.
-It takes the moon approximately 28 days, or one month, to orbit around the Earth.
-Sunlight is reflected off one half of the moon, the other half remains in a “shadow”.
-How much of the sun lit side is seen from the Earth depends on the moon’s position in it’s orbit.
-The process of the Moon’s orbit and changing phases is known as the lunar cycle.
-There are 8 phases to the lunar cycle (new moon -> waxing crescent -> first quarter moon -> waxing gibbous -> full moon -> waning gibbous -> third quarter moon -> waning cresecent)
-Once the lunar cycle is complete, it starts over again at the new moon phase.
Skills:
-determine the phase of the moon based on a diagram of the moon’s location in its orbit.
Evidence of Learning (Product or Assessment):
8 question worksheet (one question for each lunar phase) with student drawn illustrations of what the moon would like from Earth based on a diagram of where the moon is in its orbit.
Differentiation: Preteach vocabulary of cycle and phase prior to the lesson through use of the CCD. Include TPR and call and response tied to vocabulary. This is differentiation for ELL’s.
Materials: CCD, paper for input chart, LCD projector, video on youtube, individual marker boards, markers.
Teaching Strategies & Sequence:
Opening (5 minutes)
Students will be at their desk. They will read the learning objective chorally, “We will be able to understand why the moon appears to change shape” – this objective is worded in kid friendly language framed in a manner that they could understanding given their current schema.
After students read the objective, I will post a large printed picture on the board of the moon in the waxing crescent phase. “When I went outside last week, the moon liked like this.” Then I will post another picture of the moon in the first quarter moon phase. “When I went outside last night and looked at the sky it looked like this.” I will give students a moment to process. “How did this happen? Did the moon grow? Did it change shape? Did someone grab the moon and stretch it out?” I will ask students to put their heads together and discuss what this happened. After this I will hear from a view students to get a gauge on their prior knowledge.
I will then explain to the students that this mystery of sorts is what we will be solving during the lesson.
Introduction to New Material (20 minutes)
Students will transition to the rug bringing individual marker boards and their marker from their seats. On the board in front of the rug will be in the input chart. I will first draw in the Sun, explaining to students that all light in our solar system comes from the sun. I will then draw the Earth and shade in the side away from the sun, explaining to students that this side is dark because it doesn’t get light from the sun. I will then draw the moon in its orbit at the new moon phase. I will explain that just light the sun only lights up half of the Earth, it does the same to the moon. I will shade in the part of the moon facing the Earth. I will then ask students, “if we were standing at Earth, looking at the moon like this, what would we see?” I will have students turn to their neighbor and take answers until I receive the correct response. “We would see nothing because the side of the moon facing us,” I will explain, “is the dark side.” I would then sketch next to the moon in the orbit, what it would like from Earth. I will label this drawing “new moon,” the name of its phase. I will then explain to students that the moon doesn’t stay dark to us forever because it moves or obits just like the Earth does. I will then draw the moon in its next phase on the orbit. “Now the moon has moved, and the same side is still not receiving sunlight, so it is still dark. But because it has moved, we see something different. We now can see part of it with the sunshine.” I will draw a diagonal line through the moon in its orbit, show the parts we can see. I will then sketch a drawing of what the moon looks like from the Earth in this phase and label it waxing crescent. (later in the week, I further develop the terms waxing and waning as well as crescent and gibbous through the CCD). I will continue this process for every single phase.
Once this is complete, I will have students watch the animated clip of this process at http://www.youtube.com/watch?v=2aFGNGEcDOk using the LCD projector.
When this is done, I will have students discuss what they’ve learned with their partner about why the moon appears to change shape. Students will come back together and I will randomly call on students to share as a check for understanding.
If I am comfortable with students understanding WHY the moon appears to change shape, I will move on to the next portion of the INM.
In this part of INM, students will practice watch me model the skill of determining what the moon will look like from Earth based on a picture of its orbit. I will show them a picture on the overhead screen through the LCD projector of the moon in its orbit. I will then model, “Well this side of the moon is facing away from the sun, it most be dark, so I am going to shade it in. If I was on the Earth, I’d be looking at the moon from this angle. Am going to draw a line through what I could see. I can tell from what’s on the side of the line facing the Earth that most of the moon is light and only a small part is dark. From Earth it must look like this…” and I would sketch my drawing. I will model this twice.
Guided Practice (10 minutes)
I will then model a third time. This time I will call on students through equity sticks to walk me through the process. I will do this until I feel students can adequately explain how the process of solving these problems works.
When I feel like students understand the process, I will give show them a picture of the moon in its orbit. Students will work in pairs (they have assigned partners and numbers). Partner 1 will explain to partner two how to solve the problem and how to draw the moon based on the orbit. Partner 2 will draw on the board. Students will hold up the boards when finished. This is a CFU. Then I will give another picture of the moon in the orbits and students will switch roles. After each student has had a turn, I will give another for students to do on their own marker board alone. I will give as many problems as necessary until I feel students are ready to do the skill on their own.
Independent Practice (15 minutes)
Students will be sent to their seats. Students will have a worksheet with pictures of the moon in its orbit. For each one (there will be eight out of order) students will draw what the moon would look like from Earth based only upon the picture. When students are done, they will flip the paper over and attempt the challenge activity which shows a picture of the moon as seen from earth and asks them to find where it goes on the orbit. This follow up activity will serve primarily as an extension activity for earlier finishers.
Closing (5 minutes)
I will send return to the question posed in the opening. “So what happened to make the moon go from this last week, to this last night?” I will have students put their heads together again, and make one student from each team share out. The student will be selected randomly. Then we will check back in on the objective, reading it chorally once more and have students give a thumbs up if they feel they met the objective, a thumbs down if they didn’t or an in the middle if they are unsure.
1) What are the learning targets for this lesson? What do you want students to know, understand or be able to do after this lesson?
The learning objective for this lesson is that SWBAT to understand how the moon’s orbit around Earth changes the appearance of the moon as seen from Earth. Students will demonstrate this understanding by drawing a sketch of what the moon would look like from Earth when shown where the moon is in its orbit.
2) What technological resources do you have available that relate to these learning targets?
This lesson will couple a pictorial input chart from glad with an animated video that simultaneously shows moon’s orbit around earth and the moon’s changing appearance. The video will be displayed on the overhead screen through the use of an LCD project on loan from the front office.
3) How will these technological resources enhance the students’ learning—in other words, what does technology allow you to do in relation to these learning targets that isn’t possible without it?
Without the video, the lesson relies solely on the pictorial input chart. The input chart is a drawing which doesn’t move. This is problematic in many ways. First, it requires the students to use their imaginations to picture the moon moving along its orbit and changing its appearance, for some students this might be a difficult concept to visualize. Secondly, the input chart has every single phase of the moon drawn on it (it looks similar to this http://www.wordquests.info/Moon-Phases-Chart-Trans.gif). This might actually lead to many misconceptions or misunderstandings. For example, a student might think that the moon is in each of this locations in its orbit all at the same time. Another misconception that can be caused by the pictorial input chart, is that the Earth remains on the same side of the Sun because the input chart depicts the Earth in an isolated position when in fact the Earth orbits the moon as the moon orbits the Earth.
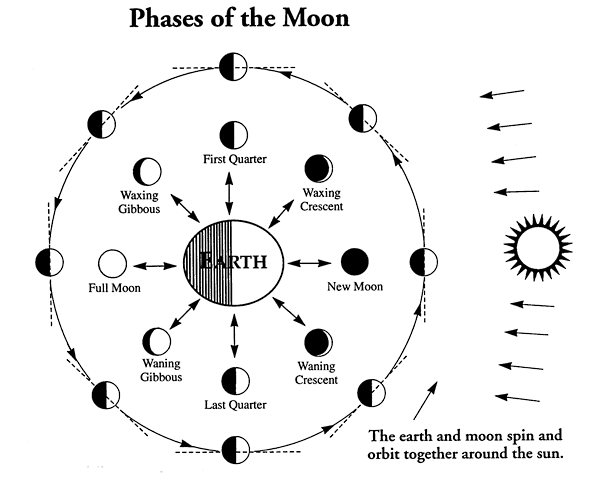
The video animation eliminates all of these barriers to understand by actually SHOWING what is being taught through the input chart. The link to the video is here:
http://www.wordquests.info/Moon-Phases-Chart-Trans.gif
4) Post your lesson plan to the site.
Grade Level/Subject: 3rd Grade Literacy
Date: January 15, 2010
Established Goals/Standards: Earth Sciences 4.b Students know the way in which the Moon’s appearance changes during the four-week lunar cycle.
Essential Questions or Habits of Mind: Why does the moon appear to change shape?
Essential Understandings: The moon only appears to change shape because of its orbit around the Earth and the light of the sun.
Knowledge:
-The moon orbits around the Earth as the Earth orbits around the sun.
-It takes the moon approximately 28 days, or one month, to orbit around the Earth.
-Sunlight is reflected off one half of the moon, the other half remains in a “shadow”.
-How much of the sun lit side is seen from the Earth depends on the moon’s position in it’s orbit.
-The process of the Moon’s orbit and changing phases is known as the lunar cycle.
-There are 8 phases to the lunar cycle (new moon -> waxing crescent -> first quarter moon -> waxing gibbous -> full moon -> waning gibbous -> third quarter moon -> waning cresecent)
-Once the lunar cycle is complete, it starts over again at the new moon phase.
Skills:
-determine the phase of the moon based on a diagram of the moon’s location in its orbit.
Evidence of Learning (Product or Assessment):
8 question worksheet (one question for each lunar phase) with student drawn illustrations of what the moon would like from Earth based on a diagram of where the moon is in its orbit.
Differentiation: Preteach vocabulary of cycle and phase prior to the lesson through use of the CCD. Include TPR and call and response tied to vocabulary. This is differentiation for ELL’s.
Materials: CCD, paper for input chart, LCD projector, video on youtube, individual marker boards, markers.
Teaching Strategies & Sequence:
Opening (5 minutes)
Students will be at their desk. They will read the learning objective chorally, “We will be able to understand why the moon appears to change shape” – this objective is worded in kid friendly language framed in a manner that they could understanding given their current schema.
After students read the objective, I will post a large printed picture on the board of the moon in the waxing crescent phase. “When I went outside last week, the moon liked like this.” Then I will post another picture of the moon in the first quarter moon phase. “When I went outside last night and looked at the sky it looked like this.” I will give students a moment to process. “How did this happen? Did the moon grow? Did it change shape? Did someone grab the moon and stretch it out?” I will ask students to put their heads together and discuss what this happened. After this I will hear from a view students to get a gauge on their prior knowledge.
I will then explain to the students that this mystery of sorts is what we will be solving during the lesson.
Introduction to New Material (20 minutes)
Students will transition to the rug bringing individual marker boards and their marker from their seats. On the board in front of the rug will be in the input chart. I will first draw in the Sun, explaining to students that all light in our solar system comes from the sun. I will then draw the Earth and shade in the side away from the sun, explaining to students that this side is dark because it doesn’t get light from the sun. I will then draw the moon in its orbit at the new moon phase. I will explain that just light the sun only lights up half of the Earth, it does the same to the moon. I will shade in the part of the moon facing the Earth. I will then ask students, “if we were standing at Earth, looking at the moon like this, what would we see?” I will have students turn to their neighbor and take answers until I receive the correct response. “We would see nothing because the side of the moon facing us,” I will explain, “is the dark side.” I would then sketch next to the moon in the orbit, what it would like from Earth. I will label this drawing “new moon,” the name of its phase. I will then explain to students that the moon doesn’t stay dark to us forever because it moves or obits just like the Earth does. I will then draw the moon in its next phase on the orbit. “Now the moon has moved, and the same side is still not receiving sunlight, so it is still dark. But because it has moved, we see something different. We now can see part of it with the sunshine.” I will draw a diagonal line through the moon in its orbit, show the parts we can see. I will then sketch a drawing of what the moon looks like from the Earth in this phase and label it waxing crescent. (later in the week, I further develop the terms waxing and waning as well as crescent and gibbous through the CCD). I will continue this process for every single phase.
Once this is complete, I will have students watch the animated clip of this process at http://www.youtube.com/watch?v=2aFGNGEcDOk using the LCD projector.
When this is done, I will have students discuss what they’ve learned with their partner about why the moon appears to change shape. Students will come back together and I will randomly call on students to share as a check for understanding.
If I am comfortable with students understanding WHY the moon appears to change shape, I will move on to the next portion of the INM.
In this part of INM, students will practice watch me model the skill of determining what the moon will look like from Earth based on a picture of its orbit. I will show them a picture on the overhead screen through the LCD projector of the moon in its orbit. I will then model, “Well this side of the moon is facing away from the sun, it most be dark, so I am going to shade it in. If I was on the Earth, I’d be looking at the moon from this angle. Am going to draw a line through what I could see. I can tell from what’s on the side of the line facing the Earth that most of the moon is light and only a small part is dark. From Earth it must look like this…” and I would sketch my drawing. I will model this twice.
Guided Practice (10 minutes)
I will then model a third time. This time I will call on students through equity sticks to walk me through the process. I will do this until I feel students can adequately explain how the process of solving these problems works.
When I feel like students understand the process, I will give show them a picture of the moon in its orbit. Students will work in pairs (they have assigned partners and numbers). Partner 1 will explain to partner two how to solve the problem and how to draw the moon based on the orbit. Partner 2 will draw on the board. Students will hold up the boards when finished. This is a CFU. Then I will give another picture of the moon in the orbits and students will switch roles. After each student has had a turn, I will give another for students to do on their own marker board alone. I will give as many problems as necessary until I feel students are ready to do the skill on their own.
Independent Practice (15 minutes)
Students will be sent to their seats. Students will have a worksheet with pictures of the moon in its orbit. For each one (there will be eight out of order) students will draw what the moon would look like from Earth based only upon the picture. When students are done, they will flip the paper over and attempt the challenge activity which shows a picture of the moon as seen from earth and asks them to find where it goes on the orbit. This follow up activity will serve primarily as an extension activity for earlier finishers.
Closing (5 minutes)
I will send return to the question posed in the opening. “So what happened to make the moon go from this last week, to this last night?” I will have students put their heads together again, and make one student from each team share out. The student will be selected randomly. Then we will check back in on the objective, reading it chorally once more and have students give a thumbs up if they feel they met the objective, a thumbs down if they didn’t or an in the middle if they are unsure.
Tuesday, January 12, 2010
115: Thoughts on Audio Directions
I enjoyed listening to the directions on audio, however it was quite time consuming. In the amount of time it took my to listen to these directions, I could have began working on the task. This is important to keep in mind with the timing of lessons. Is there enough time available for students to sit through a verbal explanation of directions?
That being said, I can see something like this being incredibly beneficial for students at lower reading levels, however audio alone might not suffice. Students who process visually will be at a disadvantage. This holds true for ELL’s and special needs students, for whom visual stimuli is usually important.
That being said, I can see something like this being incredibly beneficial for students at lower reading levels, however audio alone might not suffice. Students who process visually will be at a disadvantage. This holds true for ELL’s and special needs students, for whom visual stimuli is usually important.
Monday, January 11, 2010
115: Preassessment and Internet Safety
1. Was there anything in the internet safety presentation that was new to you? What about for your students? Do you think they are aware of this information?
I wasn’t aware of how common incidents involving online predators were. Because of the age of my students and their lack of internet access at home (and school) I am sure they are not only unaware of what dangers are on the internet but also how to protect themselves against such threats. Our internet at school has no protective filters, which on one hand is great (we have unrestricted access to important resources) but if students were to use the internet on their own, they would be susceptible to online dangers because there is no filter. Much like the video request the parents keep a computer in a common space, I know that I will need to keep the computer visible in the classroom at all times if used by a child. I will also have to brief children an appropriate computer using behaviors.
2. What technology do both you and your students have available? BE SPECIFIC! What challenges do you and your students face in regards to technology as a tool for educational equity?
My students and I have access to a laptop (without a CD-Rom or DVD drive) provided by the school. The laptop is a tablet, and because it has no mouse or touch pad, it is difficult for students to use. This computer is also my primary work computer, and is often stationed at my teacher’s desk or guided reading table for my professional use. Additionally, the wifi connection at our school is weak and unreliable. When I attempt to allow students to watch videos online, the video feed will often cut out and no video can be shown.
Due to the aforementioned reasons, students don’t have genuine access to a computer in the classroom. They don’t get to practice researching online, typing, or any other life/academic computer skills that are essential in the world in which we live.
Beyond this technology, the classroom houses a television, DVD player, and overhead projector which are frequently used for instructional purposes. Although these technology pieces are useful, they are limited in the scope of what they can do (eg: I need to have a certain DVD to play a certain educational video as opposed to using YouTube).
Additionally, most students do not have internet access at home. It is very difficult to assign tasks that require the use of the computer or the internet because of this inequity. Having technology at home would also not lower the technology inequity in our community, but would also help eliminate the language barrier and parents would be able to use the internet to translate.
3. What kinds of technology do you currently use in your class? Looking at the kinds of technology you and your students have available, are there any areas available that you have not yet thought about as a tool for learning?
As mentioned in question two, the technology available in the classroom is limited. We have a computer, television and DVD player. A CD player is also used to play music which assist with transitions (when the music is up, the transition is over).
If technology was more abundant within my classroom, I would like to have students become familiar with word processing for their writing work as well as researching, using tools like online encyclopedias for kids.
I wasn’t aware of how common incidents involving online predators were. Because of the age of my students and their lack of internet access at home (and school) I am sure they are not only unaware of what dangers are on the internet but also how to protect themselves against such threats. Our internet at school has no protective filters, which on one hand is great (we have unrestricted access to important resources) but if students were to use the internet on their own, they would be susceptible to online dangers because there is no filter. Much like the video request the parents keep a computer in a common space, I know that I will need to keep the computer visible in the classroom at all times if used by a child. I will also have to brief children an appropriate computer using behaviors.
2. What technology do both you and your students have available? BE SPECIFIC! What challenges do you and your students face in regards to technology as a tool for educational equity?
My students and I have access to a laptop (without a CD-Rom or DVD drive) provided by the school. The laptop is a tablet, and because it has no mouse or touch pad, it is difficult for students to use. This computer is also my primary work computer, and is often stationed at my teacher’s desk or guided reading table for my professional use. Additionally, the wifi connection at our school is weak and unreliable. When I attempt to allow students to watch videos online, the video feed will often cut out and no video can be shown.
Due to the aforementioned reasons, students don’t have genuine access to a computer in the classroom. They don’t get to practice researching online, typing, or any other life/academic computer skills that are essential in the world in which we live.
Beyond this technology, the classroom houses a television, DVD player, and overhead projector which are frequently used for instructional purposes. Although these technology pieces are useful, they are limited in the scope of what they can do (eg: I need to have a certain DVD to play a certain educational video as opposed to using YouTube).
Additionally, most students do not have internet access at home. It is very difficult to assign tasks that require the use of the computer or the internet because of this inequity. Having technology at home would also not lower the technology inequity in our community, but would also help eliminate the language barrier and parents would be able to use the internet to translate.
3. What kinds of technology do you currently use in your class? Looking at the kinds of technology you and your students have available, are there any areas available that you have not yet thought about as a tool for learning?
As mentioned in question two, the technology available in the classroom is limited. We have a computer, television and DVD player. A CD player is also used to play music which assist with transitions (when the music is up, the transition is over).
If technology was more abundant within my classroom, I would like to have students become familiar with word processing for their writing work as well as researching, using tools like online encyclopedias for kids.
Monday, November 23, 2009
107: Assignment 3, Chapter 11
It is increasingly clear that after reading this article, that students of elementary school age need ample amounts of physical activity throughout the day. Not only does sitting for a longer period time lead to fatigue within children, which lowers the ability to achieve academically, but it also hinders children from sharpening their motor skills. A separate article about eight years olds suggested that children of elementary school age should have breaks for physical activity every 2 hours. At my school, each child receives P.E. (which the article states many schools don’t offer) and one twenty minute recess daily, however students are required to be in class for periods of up to four hours. These articles have lead me to reflect my teaching practices. If students are not getting crucial physical activity throughout the day, how can I incorporate in my teaching?
The article also made a point about parents acting as models for healthy choices. I know that within my classroom I am often not a model of making healthy choices even though it is a core value of the school. Students frequently joke with me about the half-empty diet coke cans that are sporadically left around the classroom. Although it may seem funny, I am sending the wrong message to students. Although I tell them to make health choices, if my actions are aligned with my words, then those words a meaningless.
Another part of the article I found interesting is when it spoke of sports and how the “pressure to achieve” has negative impacts on students. The “pressure to achieve” is not merely unique to sports. We apply a lot of pressure on our students on a daily bases. Although the pressure is presented in a positive way (eg: investment systems that are marketed in an exciting fashion), the pressure is certainly still there. In many ways, students thrive off of competition and it is a strong motivator. Even in group work, when I assign students a task to complete as a group, each group has a sense of urgency to be the first done or the group with the best result even if I never stated that such an activity was a competition. Is this sense of competition and pressure negatively impacting students, especially students that don’t often feel the sort of success many other students do? If so, how do I eliminate that competitive energy around group work? I suppose it would merely be a mater of explaining to students that it is not a competition, but then how do I retain that same level of motivation and investment?
The article also made a point about parents acting as models for healthy choices. I know that within my classroom I am often not a model of making healthy choices even though it is a core value of the school. Students frequently joke with me about the half-empty diet coke cans that are sporadically left around the classroom. Although it may seem funny, I am sending the wrong message to students. Although I tell them to make health choices, if my actions are aligned with my words, then those words a meaningless.
Another part of the article I found interesting is when it spoke of sports and how the “pressure to achieve” has negative impacts on students. The “pressure to achieve” is not merely unique to sports. We apply a lot of pressure on our students on a daily bases. Although the pressure is presented in a positive way (eg: investment systems that are marketed in an exciting fashion), the pressure is certainly still there. In many ways, students thrive off of competition and it is a strong motivator. Even in group work, when I assign students a task to complete as a group, each group has a sense of urgency to be the first done or the group with the best result even if I never stated that such an activity was a competition. Is this sense of competition and pressure negatively impacting students, especially students that don’t often feel the sort of success many other students do? If so, how do I eliminate that competitive energy around group work? I suppose it would merely be a mater of explaining to students that it is not a competition, but then how do I retain that same level of motivation and investment?
Monday, October 5, 2009
107: Assignment 2, Chapter 13
Quote
“Latch key children find their way into trouble more easily, possibly stealing, vandalizing or abusing older siblings.”
One of my students, who last year had some reminisce of a structured home-life, has recently become a “latch key” child. His behavior has spiraled down this year, although it is important to note that it was always a struggle. He appears to be much angrier this year and often complains about loneliness at home and harassment from older siblings.
This article seemed supportive of after school programs. This particular student was enrolled for a week, but has not been back. I truly believe that the additional structure after school would lead to improved behavior during class and make this student a genuinely happier child.
I do however wonder if there are other strategies to provide home structure for latch key kids other than after school programs or adult supervision. If the parent is reluctant to re-enroll the student after school, what else can I suggest?
Comment
I found the discussion about the two schools of thought on education (constructivist vs. direct) to be rather interesting. It forced me to reflect on my teaching approach and assess whether or not it fit into either category clearly or whether or not it was a mix of both.
Although there are some parts of the day, while learning new vocabulary through the CCD or working in particular centers, where I feel as if students are being challenged to construct knowledge, I feel like most of my teaching is falls along the line of a more direct approach, from guided reading to grammar instruction – everything is much more teacher centered. I suppose, subconsciously, my approach leans this direction because as an educator I feel as if I have more control over directing students toward a particular desired outcome – especially in terms of students acquiring particular content knowledge.
I had not often thought about how my teaching approach might actually hinder students from developing other important skills or deprives them of meaningful hands-on learning.
Although it was not the intention of Chapter 13 to advocate for a particular school of thought, I feel persuaded to re-evaluate each element of the day within my classroom and find ways of allowing students discover and explore collaboratively.
In addition to finding the aforementioned portion of the book useful, I also thought the discussion about ethnicity in the classroom was particularly practical. Granted, at my school there is little ethnic diversity, however the strategies presented (eg: the jigsaw activities) seem like a strong method for culture building that would generally contribute to a safer and more understanding learning environment.
Question
I am also curious to find out more information about the Corner Approach and evaluate how well my school meets the three elements. I feel like my school does do an effective job at creating a comprehensive school and staff development plan as well as involving parents. But I am not entirely sure what exactly the Corner Model precisely says.
“Latch key children find their way into trouble more easily, possibly stealing, vandalizing or abusing older siblings.”
One of my students, who last year had some reminisce of a structured home-life, has recently become a “latch key” child. His behavior has spiraled down this year, although it is important to note that it was always a struggle. He appears to be much angrier this year and often complains about loneliness at home and harassment from older siblings.
This article seemed supportive of after school programs. This particular student was enrolled for a week, but has not been back. I truly believe that the additional structure after school would lead to improved behavior during class and make this student a genuinely happier child.
I do however wonder if there are other strategies to provide home structure for latch key kids other than after school programs or adult supervision. If the parent is reluctant to re-enroll the student after school, what else can I suggest?
Comment
I found the discussion about the two schools of thought on education (constructivist vs. direct) to be rather interesting. It forced me to reflect on my teaching approach and assess whether or not it fit into either category clearly or whether or not it was a mix of both.
Although there are some parts of the day, while learning new vocabulary through the CCD or working in particular centers, where I feel as if students are being challenged to construct knowledge, I feel like most of my teaching is falls along the line of a more direct approach, from guided reading to grammar instruction – everything is much more teacher centered. I suppose, subconsciously, my approach leans this direction because as an educator I feel as if I have more control over directing students toward a particular desired outcome – especially in terms of students acquiring particular content knowledge.
I had not often thought about how my teaching approach might actually hinder students from developing other important skills or deprives them of meaningful hands-on learning.
Although it was not the intention of Chapter 13 to advocate for a particular school of thought, I feel persuaded to re-evaluate each element of the day within my classroom and find ways of allowing students discover and explore collaboratively.
In addition to finding the aforementioned portion of the book useful, I also thought the discussion about ethnicity in the classroom was particularly practical. Granted, at my school there is little ethnic diversity, however the strategies presented (eg: the jigsaw activities) seem like a strong method for culture building that would generally contribute to a safer and more understanding learning environment.
Question
I am also curious to find out more information about the Corner Approach and evaluate how well my school meets the three elements. I feel like my school does do an effective job at creating a comprehensive school and staff development plan as well as involving parents. But I am not entirely sure what exactly the Corner Model precisely says.
Sunday, September 27, 2009
107: Assignment 1, "40 Development Assets for Child Development"
It is clear that after looking at the 40 Development Assets for Child Development, that educators can play a substantial role in helping students grow up as “healthy, caring and responsible” individuals.
In terms of external support, teachers provide “other adult relationships” that provide the child opportunities to develop nurturing relations outside of the family unit. The classroom is also a place where students are used as resources that provide children with a strong sense of value and belonging. Through school, we can also teach students the value of serving others and create those opportunities (food drives, etc). Teachers also are positive role models and set strong examples. We also can set high and powerful expectations for students in work and behavior that are positive.
Even internal assets can be influenced by teachers. Students must be taught many things before they are able to engage in them. One example is peaceful conflict resolution. Many children struggle with resolving problems without violence, because it hasn’t been modeled or shown to them. As a teacher, we can influence this. We can also build a student’s self-esteem and sense of worth and purpose. Every internal asset is something we, as instructors, are able to influence.
What the 40 Assets have shown me, is that teachers can play an instrumental role in the positive development of a child.
In terms of external support, teachers provide “other adult relationships” that provide the child opportunities to develop nurturing relations outside of the family unit. The classroom is also a place where students are used as resources that provide children with a strong sense of value and belonging. Through school, we can also teach students the value of serving others and create those opportunities (food drives, etc). Teachers also are positive role models and set strong examples. We also can set high and powerful expectations for students in work and behavior that are positive.
Even internal assets can be influenced by teachers. Students must be taught many things before they are able to engage in them. One example is peaceful conflict resolution. Many children struggle with resolving problems without violence, because it hasn’t been modeled or shown to them. As a teacher, we can influence this. We can also build a student’s self-esteem and sense of worth and purpose. Every internal asset is something we, as instructors, are able to influence.
What the 40 Assets have shown me, is that teachers can play an instrumental role in the positive development of a child.
Subscribe to:
Posts (Atom)